Video Tutorials
1. Install Timber #
Option 1: Via GitHub (for developers) #
1) Navigate to your WordPress plugins directory #
$ cd ~/Sites/mywordpress/wp-content/plugins
2) Use git to grab the repo #
$ git clone git@github.com:timber/timber.git
3) Use Composer to download the dependencies (Twig, etc.) #
$ cd timber $ composer install
You can find a guide on how to get started with Composer in the official documentation.
Option 2: Via Composer (for developers) #
1) Navigate to your WordPress plugins directory #
$ cd ~/Sites/mywordpress/wp-content/plugins
2) Use Composer to create project and download the dependencies (Twig, etc.) #
$ composer create-project --no-dev timber/timber ./timber
You can find a guide on how to get started with Composer in the official documentation.
Option 3: Via WordPress plugins directory (for non-developers) #
If you’d prefer one-click installation, you should use the WordPress.org version.
Now just activate in your WordPress admin screen. Inside of the timber directory there’s a timber-starter-theme directory. To use this, move it into your themes directory (probably want to rename it too) and select it.
2. Including a Twig template and sending data #
In which we use an existing WordPress template and implement a very simple Timber usage.
Here’s the relevant code:
index.php
<?php
$context = array();
$context['headline'] = 'Welcome to my new Timber Blog!';
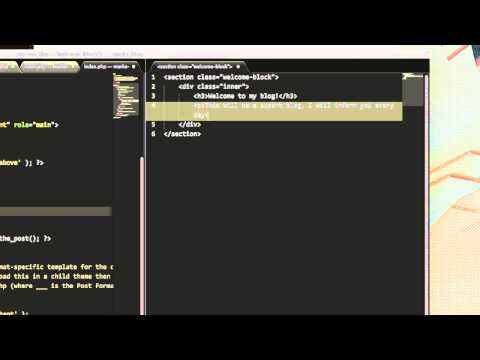
Timber::render( 'welcome.twig', $context );welcome.twig
<section class="welcome-block">
    <div class="inner">
        <h3>{{ headline }}</h3>
        <p>This will be a superb blog, I will inform you every day</p>
    </div>
</section>
3. Connecting Twig to your WordPress Admin #
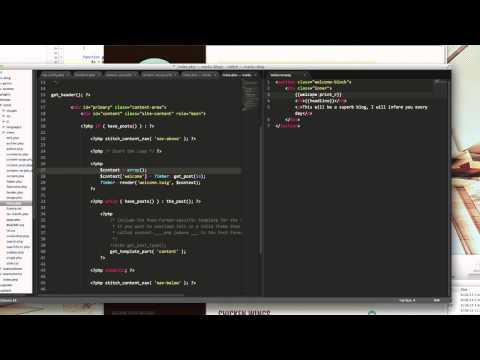
<?php
$context = array();
$context['welcome'] = Timber::get_post( 56 );

Timber::render( 'welcome.twig', $context );<section class="welcome-block">
<div class="inner">
<h3>{{ welcome.title }}</h3>
<p>{{ welcome.content }}</p>
<p>Follow me on <a href="https://twitter.com/{{ welcome.twitter_handle }}" target="_blank">Twitter!</a></p>
</div>
</section>4. Converting HTML to Twig Templates #
<?php
$context['posts'] = Timber::get_posts();

Timber::render( 'home-main.twig', $context );
home-main.twig
{% for post in posts %}
{% include 'teaser-post.twig' %}
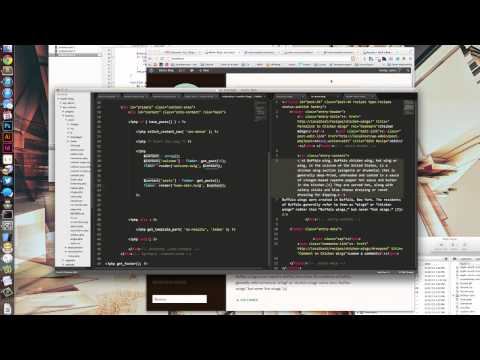
{% endfor %}5. Using Custom Post Types with Timber + Twig #
home-main.twig
{% for post in posts %}
    {# You can send an array to "include". Twig will use the first template it finds. #}
    {% include ['teaser-' ~ post.post_type ~ '.twig', 'teaser-post.twig'] %}
{% endfor %}
teaser-recipe.twig
<article id="post-{{ post.ID }}" class="post-{{ post.ID }} {{ post.post_type }} type-{{ post.post_type }} status-publish hentry">
    {% if post.thumbnail %}
        <img src="{{ post.thumbnail.src|resize(600, 300) }}" />
    {% endif %}

    <h2>{{ post.title }}</h2>

    <div class="post-body">
        {{ post.content }}
    </div>
</article>
6. Extending Templates #
Todo: Record Screencast showing this
This is a really important concept for DRY. I’ll show how to create a base template that can power your site:
Create a base.twig file: #
base.twig
{% include "html-header.twig" %}

{% block head %}
    <!-- This is where you’ll put template-specific stuff that needs to go in the head tags like custom meta tags, etc. -->
{% endblock %}

</head>

<body class="{{ body_class }}">

{% block content %}
    <!-- The template’s main content will go here. -->
{% endblock %}

{% include "footer.twig" %}

{{ wp_footer }}

</body>
</html>
You can use this in a custom single.twig file: #
single.twig
{% extends "base.twig" %}

{% block head %}
    <meta property="og:title" value="{{ post.title }}" />
{% endblock %}

{% block content %}
    <div class="main">
        <h1>{{ post.title }}</h1>
        <p>{{ post.content }}</p>
    </div>
{% endblock %}